Il parait que j'ai quelques lecteurs Français- et bien, si les choses ne sont pas très claires, dites-le moi et je me tâcherai de faire un peu de traduction.
Bonne année!

Il parait que j'ai quelques lecteurs Français- et bien, si les choses ne sont pas très claires, dites-le moi et je me tâcherai de faire un peu de traduction.
Bonne année!
So here is some of the progress so far.
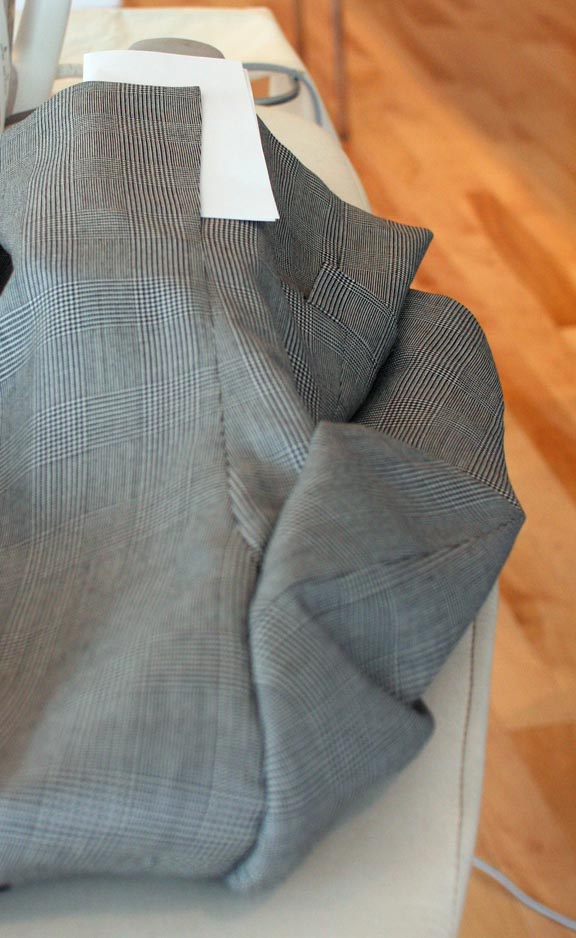
As promised, I pulled the pad stitching from half the collar and redid that half by hand; the stand is pretty heavily padded, the fall is more lightly padded and the ends were curled under as I worked to keep the corners tight to the chest. After breaking the collar, there is no noticeable difference in shaping or shape retention, though that may change, particularly after it's been worn so we'll have to keep checking back on this one. The side which looks bare is the one done by machine- it is done with a fine, clear monofilament thread which is nearly invisible.
Going back to the business of felling, here you see that the facing seam has been sewn to the canvas; this can also be done by blindstitch machine. As we work across the garment we are sewing everything together, in place, so that nothing moves once it's been (shudder) steamed or had its first chemical bath at the dry cleaners. On more economical garments, this seam may be glued in place, which will come apart after a few cleanings; some garments whose lining has been "bagged" will not be tacked at all.
I talked about Chris Despos' method of balancing the patterns on the back; this is the result for this check. Normally when I draft the back, the result would have the lines evenly balanced (mirrored) at the neck so that the collar matches but very close together at the hem. Chris' idea is to balance the pattern at the hem, as shown- this requires more shaping with the iron to get a good shape to the back, but I like the result shown below. I recently worked with a navy cloth with a very bold white windowpane; it would have been much nicer done with this method. My one snag is that I like to be able to keep a person's pattern on file once a garment is finished so that there is less fitting the next time I cut a garment; with this method a new back must be drafted for every cloth if it is a stripe or a check, requiring different amounts of shaping and fitting. One of those techniques I'll keep tucked up my sleeve for when I have very distinct fabric designs.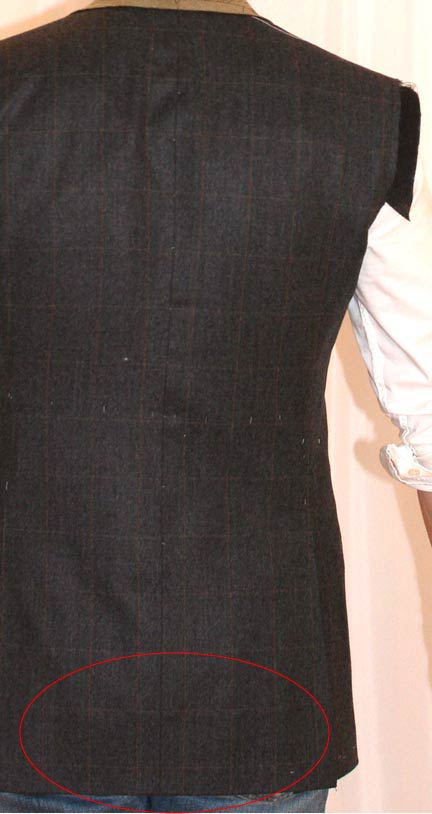
To further drive points about felling and steaming home, let's consider this side vent (look closely, it's there); the back hem is folded up and the back underlay is folded under- the side body seam allowance is folded back and the hem is folded up. This is a lot of folding- eight layers of cloth, not to mention the lining. A lot of stuff to fall out of shape as a result of humidity and cleaning, which is why we fell everything in place, so it keeps this nice flat appearance. But let's consider that many manufactured garments are not felled so that the lining can be bagged; let's also consider what happens to a pant crease when it is steamed- it relaxes unfolds itself. So someone who takes their jiffy steamer to the back to get rid of wrinkles is also relaxing those 4 creases used to create the vent and since they are not felled in place they just open up. I can guarantee you that the vent will not sit flat any more.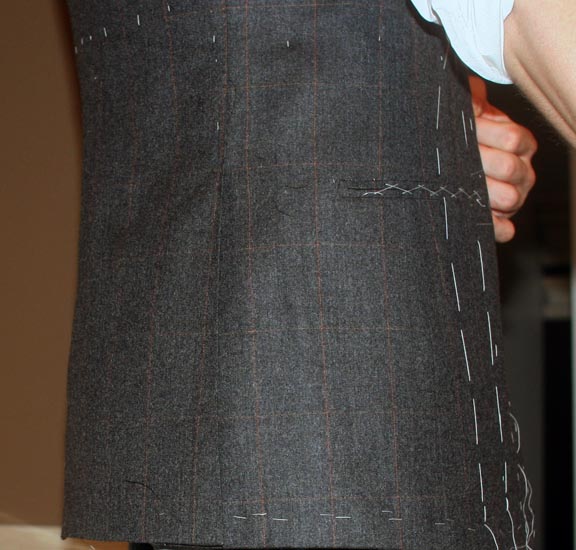
The most intriguing for last.
The proponents of hand sewing the sleeve talk about elasticity and looking at the chain stitch versus tape in the armhole looked promising in this regard so I decided to observe what areas of the garment come under the most strain during movement and was surprised at what I saw. When we reach forward we feel the back of the armhole straining; this area is mostly bias and so I figured if the chain stitch and hand sewing could provide support and elasticity it would be far superior to a lock stitch. But what I saw (and is difficult to see in the photograph) is that the back armhole was not even touching my body at all; the forward motion of the arm was dragging on the front of the armhole, causing the area shown in yellow to pull, and that the garment was pulling on my blades but mostly along the latissimus dorsi. The bias area received no tension at all, and the area under strain is on the straight grain so there would be not much give at all. The front of the armhole and a large part of the underarm are tacked into the canvas which negates any benefit of elasticity so I am starting to have big doubts about this. I also wonder if those who equate hand-sewn seams with elasticity consider that bathing suits and T shirts are sewn by machine and yet are elastic so if elasticity is really so key then surely a machine dedicated to those operations requiring it would have been invented. There are still enough big guns who advocate hand-sewn sleeves so I am still not ruling it out but it's starting to look like marketing hype to me.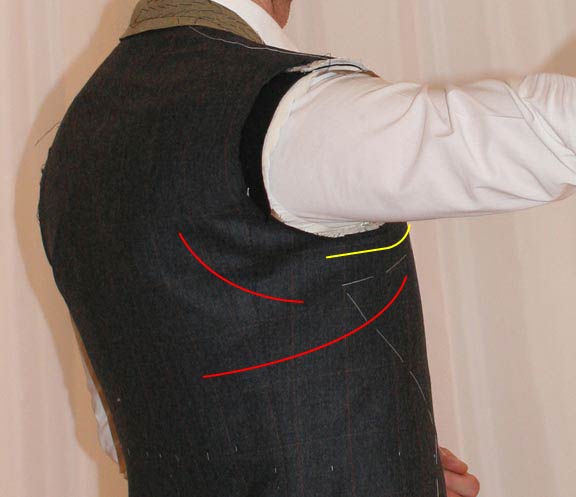
As I was preparing the armholes a contextual distinction came up; there are two sides of the tailoring coin- one is the independent tailor shop, the other the factory. Why is this important? In the context of a tailor shop, which may have only a lockstitch (plain) machine and maybe a serger and blind-stitch machine, there are a great deal of operations which must be done by hand to be done correctly. In a factory there may be machines which can do the same operation to the same level of quality but in a fraction of the time. So to say a certain operation is better by hand than by machine can be true if in the context of a tailor shop, but not true if in a factory. But it goes beyond that.
I am preparing the armholes to eventually have sleeves set in. Certain parts of the armhole are susceptible to stretching, and others must be kept short in order to create shape; the lower part of the front armhole is held short to help build the chest and to keep the sleeve tight to the body. The back armhole is held short to clean up the blade area. The majority of makers use a small cotton tape in the armhole to prevent stretching and to hold the extra length, like this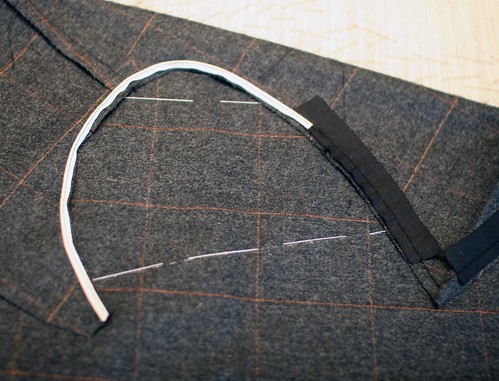
The black cotton tape serves to stabilize once this area has been shaped, and so that the sleeve setting is cleaner.
The makers who attach their sleeves by hand normally do not use this tape which "locks" the armhole, but make a chain stitch by hand, which holds the armhole, draws it short where needed, but is still elastic. There is an amount of give and recovery which you don't get when the tape is used.
But then it occurred to me that we have machines which make this exact stitch and can perform this same function; in the case of the tailor shop, it is true that doing this by hand provides elasticity, but in the case of Kiton or Oxxford, they would be able to afford such a machine that performs the same job. If you are going to insert your sleeve by hand in order to preserve the elasticity in the seam, you would not use tape but use a chainstitch. It then occurred to me that it might then be confusing or difficult to explain to a consumer that one is done by hand, the other machine, but that one machine method is identical to the hand method whereas another machine method is far lesser. It then becomes a blog subject :) Maybe it's just better to do by hand in order to preserve the cachet of the "hand sewn armhole" since the consumer perception is that the hand sewn would necessarily be better.
Whatever the case, I am leaning favorably toward the chain-stitch rather than tape right now, and could eliminate the tape in my factory in favor of a chain stitch method. In this case, an industrial duplication of a traditional, hand-sewn application. To be continued......
I'd like to wish everyone happy holidays, and a healthy and prosperous new year!
This period is a little anti-climactic for me- after the rush to get everyone's suits finished for the holidays, coupled with the Christmas shopping and parties and general craziness, we close for the next ten days and I don't know what to do with myself. I'm not very good at doing nothing and I've gone through my last pile of books. So the experiment will continue.
I have made garments entirely by hand before, and one which were partly done by machine because I don't think that it's worth doing certain things by hand, like the collar padding and the sleeve hanging. However I've never been able to really properly compare the two so my opinions are untested- really, I should make two suits out of the same cloth and same trimmings but made using the different techniques. Ok, I may be a clothing geek but I'm not quite that hardcore; there is a limit to what I will do in the interest of sartorial investigation. Instead I'll do a half-and-half.
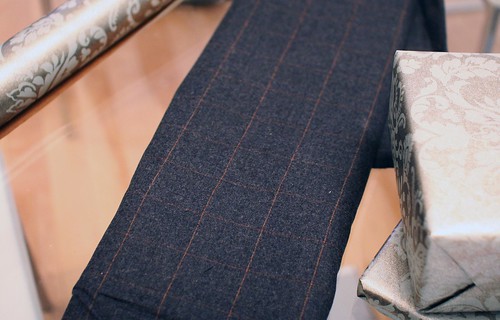
I found and end of flannel, a nice charcoal with a camel-coloured windowpane which unfortunately does not photograph all that well- it's a lot nicer in person. I'm going to do my back the way Chris Despos does and see how that turns out. I'm going to see if I can match the sleeve to the back like in the Paul Smith garment pictured elsewhere on this blog. I'm going to take some pre-padded collar melton and undo half of the padding and redo it by hand to see if there's a difference between the two. I'm going to sew one shoulder seam by hand and the other by machine. I'm going to set one sleeve by machine and one sleeve by hand.
I will either end up with a garment which looks distinctly different one side from the other and will thus be unwearable but it's an end so it doesn't matter- all I have lost is my time; however, I will have learned something in the process. Or I will have a wearable garment which may be more comfortable on one side but is visually indistinct from the other, in which case I will have a wearable suit and will have learned something in the process. Either way I will have learned something and either proved or disproved some of my theories, at least to me. So it's win-win.
Happy holidays!
I showed how to spot the different ways of hemming a lining and explained why it would be better to do by hand or by the special felling machine, since allowances inside are felled in place. But what does that really mean?
Have you ever got your trousers back from the cleaner and there was a phantom crease near the new crease in your trouser? A result of wear, humidity and the cleaning process, the trouser loses some of its crease. If the presser at the dry cleaner is not extremely careful, he will not make his new crease in exactly the same place as the old one. The same can apply to hems and vents- during construction they are usually basted in place so when they are creased, they are creased exactly where we want them to be. If, as a result of wear, humidity or cleaning the hems fall or the vent puffs, it can be difficult to get the crease back in the same place as the old one. One of the goals of tailored clothing is for the garment to maintain its original shape for its useful life; in order to prevent hems from sagging and vents puffing and lining and facings falling out of shape, we tack as much as possible in place, which is permanent. Looking at the photo of the back panel (which has side vents) I am turning up the vent underlay to show how this underlay has been invisibly felled in place using a zig-zag-shaped stitch. Along the bottom, you can see (though not all that clearly) that the hem has been cross-stitched to the cotton interlining, which has, in turn, been stitched to the garment fabric using the same type of stitch as the vent underlay. This can also be done using special blind-stitching machines. This felling prevents the lining from being sewn in using a conventional lock-stitch machine, which is why it must be felled using the felling machine or by hand, as illustrated in the post on hems. So when you see a hem sewn by lockstitch machine (the bright blue lining in that post), you are seeing the manner of closing the lining but you also know for certain that the allowances have not been felled in place, only tacked at the seams, unless glue was used to hold things up, which itself can wear out after wearing and cleaning; it is also almost guaranteed that the facing has been glued in place rather than felled with a blindstitch.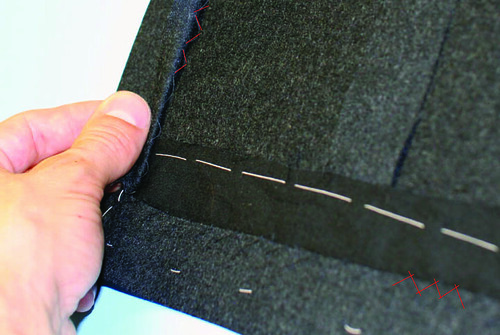
I don't usually get nervous while I'm working but I'm drafting a gentleman's overcoat this morning and he is flying in for a skeleton fitting later this week so I need to rush a little. Lovely pure cashmere from Cerutti- I'll need about 4 yards at $500 a yard. That's $2000. Not something one wants to goof up.
For those who have been wondering about their options when ordering made-to-measure suits, below is a list of alterations which are typically available- far more than the few length and girth adjustments which may have been offered in the past. Keep in mind that the success of the fit relies entirely upon the person measuring you since they are required not only to take measurements but to be able to judge your posture. If you are concerned about the salesperson’s ability to fit you, ask about trunk shows in which representatives of the company which will make the garment will be in store- often there are discounts offered during these shows and you will be sure to have an experienced fitter on hand.
This list is by no means exhaustive (and covers only the jacket- there are more for trousers) but will give you an idea of the flexibility of modern MTM programs.
Lengthen/shorten jacket
Lengthen/shorten sleeve
Button stance higher/lower
Pocket higher/lower
Increase/reduce back
Increase/reduce center front
Increase/reduce waist
Increase/reduce seat
Increase/reduce waist and seat
Sloped shoulder
Square shoulder
Erect
Stoop
Easy armhole
Full chest
Flat chest
Longer/ shorter strap
Dip neck
Pinch neck
Short/long neck
Big/small neck
Forward shoulder point
Big arms
Deeper/higher armhole
Sway back
Round back
Hollow back
Prominent/flat blades
Arms back/forward
Increase/reduce point to point
Left low/ right low
I learned a new technique just now. Well, not exactly. It's just a different way of doing something I do already but I never thought of doing it that way. Chris Despos, a Chicago tailor, posted some photos of his work on Styleforum, showing how he balances patterns down the center back seam.
But I'm not excited about learning a new way to balance checks. I am excited because it was another reminder to me of how we get boxed in by our own dogma. The line at center back is the very first line you draw when drafting a suit pattern. You square down and out from a point which is the neck. I then shape my center back seam, 1/2" to 3/4" in from that line at the waist, down, depending on the shape of the back. I have always done it this way. It is almost sacred to me, being the first few lines in a draft. It has never occurred to me to do it any other way because to do so would require some shaping which I already know how to do anyway for a different style of back- his is a brilliant combination of the two methods. So why did I never think of doing it Chris' way?
Because I always did it my way. That's all.
How many other techniques or interesting ideas am I not open to just because I am still tied up by my understanding of the "rules" of tailoring? Chris just reminded me to open my eyes and my mind a little. He reminded me that when we think we know something or understand something we close our minds to learning new things.
Thanks, Chris.
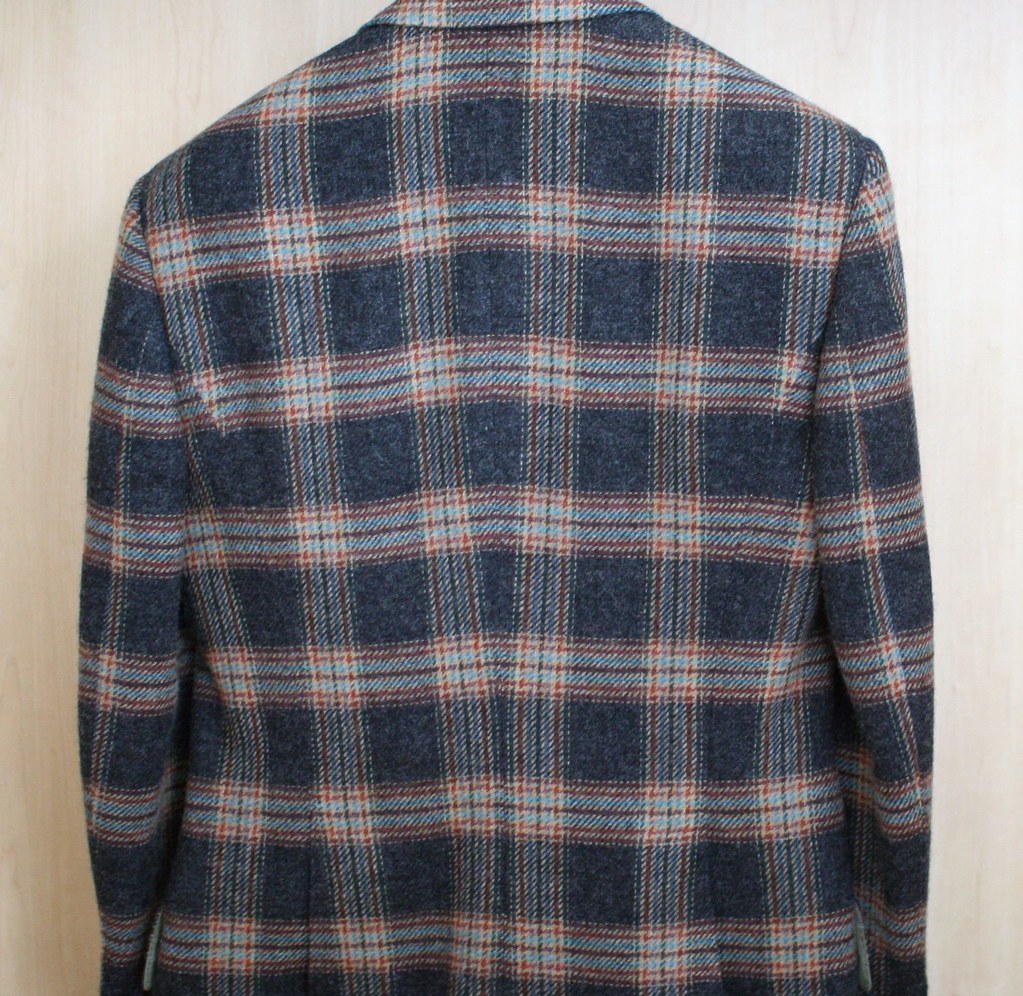
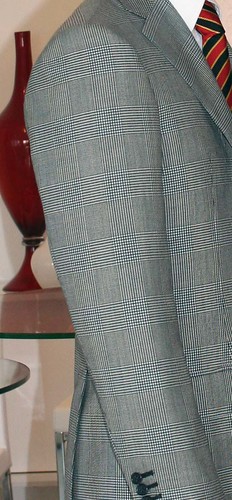
Some tailors are not so concerned with matching patterns while others are obsessed by it. I am of the latter school. The photo above is a jacket by Paul Smith; he has some extremely clever people working for him. Notice how the plaid of the sleeve matches the plaid of the jacket (well, the right is a little off)? This is the first time I have ever sen this. Is it a fluke? Can it be reproduced? I can reliably match the sleeve to the front every time, so is it possible to do the same on the back? I have been puzzling over this for a while. Once conclusion that I have come to is that so long as I have the little "wedge" where I make the front pocket (is there a real name for that wedge?) I will not be able to balance the sleeve plaid on the back. When my laptop is feeling better and I get Illustrator back, I will post a draft explaining what I mean. I think I am on to something, but to do it I have to eliminate that little wedge and I think that might cause the lower front to kick out a bit so I am hesitant; I have never had much success without it. Does anyone have any thoughts on the matter? Does anyone even care?
I recently posted a tutorial on a forum about touching up a suit, with the admonition that you should never steam a suit or hang it in a steamy washroom. I received a number of replies that people saw absolutely no harm in doing so and that they had been doing so for a long time. I found it odd that, despite several tailors on that forum all insisting that one must not steam a suit, people insisted that they knew better. Having taken a deep breath, I realize that not knowing the importance pressing plays is tailoring a suit it would be difficult to understand the effects of steam.
I will say that pressing, which includes the shaping before, during, and after tailoring, plays one of the most important roles in shaping a suit, more so than many of the sewing operations. To illustrate the point, let's look at the shaping of a sleeve.
Look back at the photo of my suit and have a look at the way the sleeve curves to follow my arm. To do this we need several seams and some careful pressing. The elbow seam follows the outside of the sleeve, but the seam at the front of the sleeve is tucked 3/4" to 1" inside the fold of the sleeve in order to conceal it. In the photo below, observe carefully how the lines of the check on the undersleeve are straight but the top sleeve are very curved. This is not at all natural.
Normally we need a seam at the exact place that shaping will occur, that is to say, right along that front fold, not 1" back. If I fold the topsleeve back in its natural state, observe below that not only is the front of the sleeve straight, but the curved edge goes in the opposite direction from that which we want. Here comes one of the bits of tailoring magic.
I will use a great deal of steam and pressure, holding the iron in one hand, pressing down in a very specific method, and carefully stretching the top sleeve the length of the curve. There is technique to this that must be learned properly or the sleeve will never hang properly. Using steam and heat, I have re-shaped the top sleeve and re-set the shape, much like using curlers or a curling iron on hair. It is no longer a flat, two-dimensional piece of cloth, but has a shape. Folded into position, the seam now takes its proper shape and the sleeve will curve with my arm.
Just the way I used steam to shape the sleeve, if I use steam on the sleeve without holding its stretched, curved position, I will undo this shaping. The sleeve will relax and hang straight instead of curving, and the tension created will cause a small break just below the elbow. It is a subtle thing to some, but to tailors it is glaringly obvious. It is one of the first signs that a suit has been mishandled. You probably never noticed before, but maybe now you will. And this is only one piece; not a piece of a suit (and there are many) is left flat, without any of this sort of manipulation, and steaming a suit can undo it all. You may not see it at first but you can learn to see it, and put your steamers away.
BY request, here is a tutorial on touching up a suit which I originally posted on Style Forum.
A large part of the beauty of a tailored garment is due to the shaping and molding imparted by a careful and elaborate pressing. In a manufactured garment. there are over 20 different underpressing operations and around 15 steps in the final pressing, most of which have specially-designed forms and machines. Pressing is an art which takes a long time to learn and it is not within the scope of this post to teach proper pressing; I will, however, attempt to show you how to touch up a garment at home without wrecking it, since bad pressing or steaming can ruin a well-made garment.
Wool is a hair, like human hair, which can be shaped using heat and steam. Think of a lady putting her hair in curlers and sitting under a hair dryer, or using a curling iron. We use the same principles when building shape into a suit.
First of all, NEVER use a steamer on a suit, and never hang your suit in a steamy bathroom. This bears repeating. NEVER use a steamer on a suit, and never hang your suit in a steamy bathroom.
A steamer will undo all the shaping that was created when the suit was made, and steaming a suit can also make problems appear such as puckering and blown seams, breaking sleeves etc. I know a lot of people enjoy the ease of a steamer or hanging a suit in the bathroom to get rid of wrinkles, but it is really a very bad idea. There is a video on the internet showing someone pressing a suit with far too much steam and without a good understanding of a suit; during the video the person blows one of the seams, which starts to pucker terribly and she is unable to fix it. It is just this sort of mistake I hope to prevent you making. If you steamed a lady’s hairdo which hat been set using curlers or curling iron, the hairdo would fall limp and lose all its shape- you wouldn’t do this and you won’t do it to a suit for the same reason. Also, when pressing, let the area you have pressed cool and dry thoroughly before moving the garment since it is still malleable and you can cause more problems; do not press until the fabric is dry as the fibers will become brittle- factories and pro pressing equipment use vaccuum to draw the excess steam and heat out so the process is faster.
Have a look at this video (with apologies to the woman who posted it)
[url]http://www.expertvillage.com/video-s..._iron-suit.htm[/url]
The first thing to address is your pressing equipment; if you only have an ironing board to work with the weight of the jacket falling off it will make it very difficult to control, you also need something to work smaller areas like the sleeves. For this reason I suggest getting, or better yet, making a good sleeve board. Lower your ironing board to about hip level and place your sleeve board on top of it. 
You will need a press cloth, a bowl of water, and a small sponge or rolled-up wash cloth. To make a press cloth, get a fairly heavy cotton drill from your local sewing supply store and was it a few times to get any sizing out; a press cloth is important because it helps prevent the shine that is extremely difficult to remove.
Have a look at my finished garment- it is not flat, but made up of many shapes and curves- the convex curve of the chest, the concave curve of the waist, yet another convex curve at the seat, the complex shape of the shoulder, the gracefully curving sleeve, the rolling lapel, the curve of the collar as it hugs the neck, and so on. Your pressing surface is flat; pressing a shapely garment on a flat surface will generally ruin the shape of the garment, unless you know how to work with the shape and the surface.
In the sewing process we use 3 techniques to build shape-
Darts and seams, in which the shape is built by sewing.
Easing- drawing fullness or excess cloth onto a tape or another seam.
Stretching and shrinking using heat and steam.
If there are stripes or checks in your suit, it helps to observe them as they will show you where you are distorting your suit as you press it. When I say to "keep it short" it means you should be trying to shrink the cloth a little and be careful not to pull or stretch at all- this is crucial to the shape of your garment.
The worst areas will be behind your knees, the crotch area, the elbow of your sleeve, and the back of your jacket. Remember you are PRESSING your garment, not ironing it; do not rub the iron all over the place. Use steam sparingly, since your iron will send steam all over the place and not necessarily where you need it. If you have a small crease or impression in an otherwise good area, moisten the press cloth just the size of the crease and press- this way you will elminiate the crease without possibly disturbing the rest of the garment or causing new impressions.
The pant is pretty straightforward- using a press cloth and a fair amount of steam, place the sleeve board inside the leg and press out any creases in the crotch area. Be careful around the fly, using less steam, as it is difficult to press it well without making marks or puckers.
Now place the pant flat on a regular ironing board, lifting one leg out of the way. Press the creases first from the inside, then from the outside, being careful around the seam area- the thickness can cause you to blow the seam on the other side of the pant. Many tailors will shape the pant leg by gently shrinking the crease behind the thigh.
Now on to the jacket.
Place the back on the sleeve board, centering the side seam. If the jacket has side vents, place a piece of heavy paper under the top layer of the vent to avoid making an impression on the under vent. Press the seam carefully. At the top four inches or so of the side seam, as well as along the armhole and shoulder seam we have worked some fullness- the back is longer than the side body and the back shoulder is quite a bit longer than the front shoulder; if you steam this or press without adequate pressure you will blow the seams and they will pucker. Be careful not to touch the sleeve with your iron. Keep the seam short- do not stretch it. Lift the vent away and press the undervent.
Work across the back, keeping the area between the shoulder blades short. If you have a center vent, use the same technique as for the side vent.
Centering the side body on the board with seams toward the edges, press the side body keeping the waist short so as not to ruin any of the suppression. The top four inches or so of the front is longer than the side body- there is some fullness in this seam which will also pucker if you are not careful.
The front is one of the easiest areas to wreck and one of the most obvious when you know what you are looking at. Look back at the photos of the finished garment and observe the shape of the chest. This is built by the front dart, but also some maniuplation of the armhole- there are several layers of canvas unerneath to help build up this shape. When working on the front, ALWAYS keep the dart along the edge of your board, and NEVER place it flat on the board like this;
If you were to press the chest this way, you would flatten the chest, and you will likely see some blousiness under the arm as the extra fabric collapses.
Lay the front of the jacket, lining the dart up with the edge of the board and press the front area as shown. Make sure the stripe is straight. If you must press the flap, place a piece of paper under it before pressing, then lift it and remove any impressions, the same way you pressed the vent. 
Press the rest of the front, again lining up the dart with the edge of the board, being careful to keeep the lines straight as you go around the armhole. Be careful around the sleeve cap not to use too much steam since you don't want to disturb the sleeve.

Press the lapel and collar as shown, lining up the roll line with the edge of the board, being careful not to remove the crease since you will have a hard time recreasing the collar and lapel. Try not to touch the collar too much as you will likely stretch it and it will not hug your neck anymore.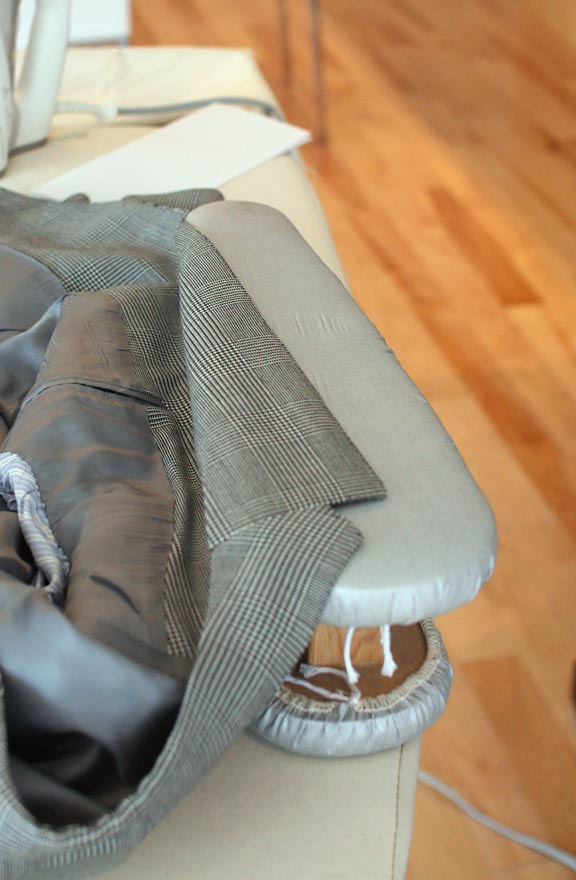
To press creases out of the elbow area, insert the sleeve board into the sleeve with the under sleeve showing, lining up the back seam (outseam) of the sleeve with the edge of the board; the inseam of the sleeve (the seam along the front) should be about ¾” in from the edge. Achieving a well-curved sleeve is a minor miracle of stretching, shrinking and pressing, so be careful here.
Insert the board into the sleeve, keeping the curve as shown, and press out any creases. 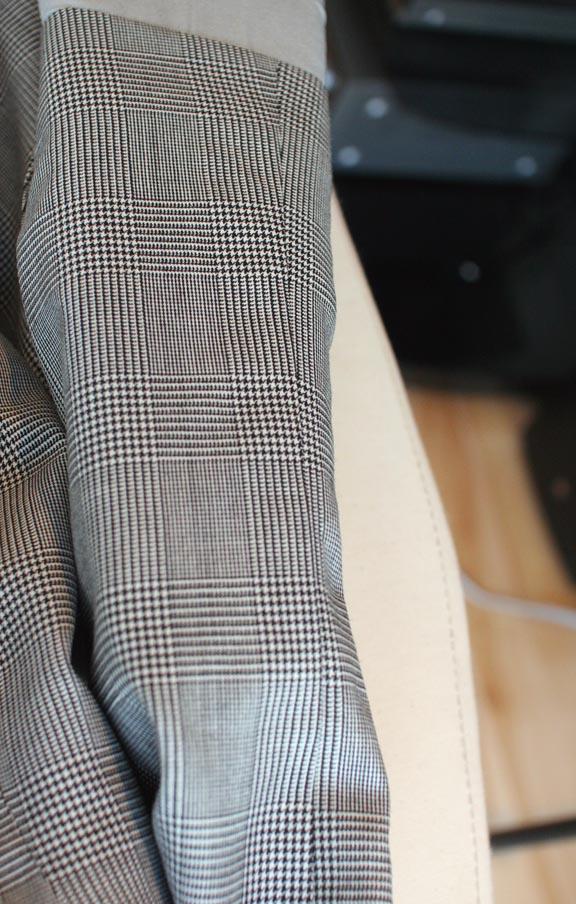
Flip the sleeve, keeping the outseam along the edge of the board, and press the top sleeve.
Now place the jacket over the board, and press the top of the sleeve, but stay away from the amhole seam as you could wreck it there.
If you have blown any of the seams (if they look a little puffy instead of flat), reduce the heat of the iron, turn the steam off, and give them a gentle press.
After cleaning your suit will need a good press- if you suspect your dry cleaner uses the inflatable steam bodies, or does not do a good job pressing, innist that they not do it and find a good presser or tailor to do it for you. It will cost more but is a good investment for the appearance of your suit. If they will allow it, watch them as they press- you will develop an appreciation for the real complexity of it and the care that goes into a good pressing.
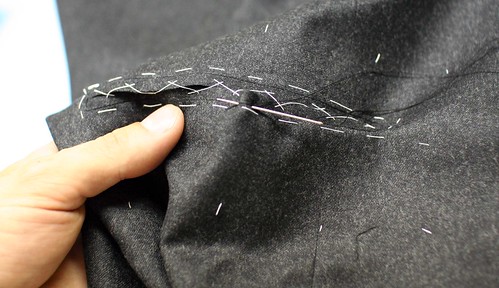
One thing that is easy to spot is a hand-finished lining. The little stitches are fairly uneven and poke through the edge of one side of the seam which has been lapped over the other. There are several reasons to do this, and a multitude of different areas it may be done.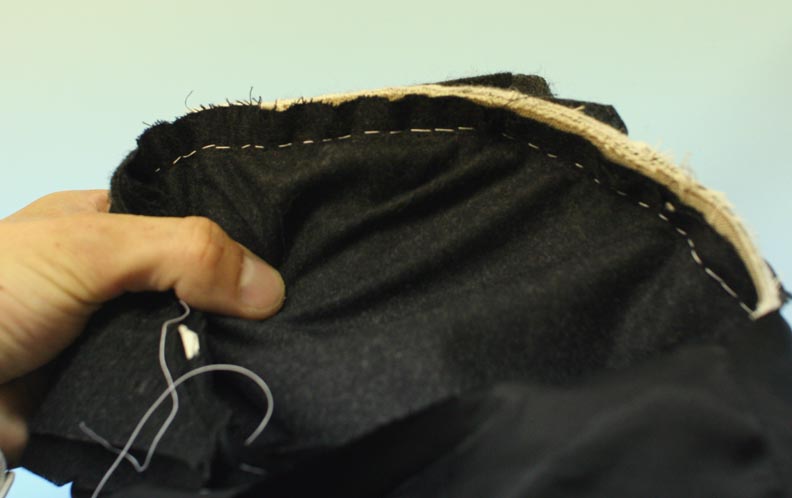
The most common area felled by hand is the armhole. Have you ever inserted your arm into a sleeve and the lining twisted or bunched or caught on something and you felt caught in your sleeve? Tailors don't like having stuff like linings and facings just floating loose, twisting one way while the jacket goes another. So the seam allowances of the lining on better jackets are basted (sewed) to the seam allowances of the sleeve- they now act as one unit and won't twist, or worse, hang out the bottom. Having attached these two means that we can no longer get inside the sleeve to close the armhole by machine, so it is closed by hand. But even more important than that, stitching through multiple layers make things firmer. More stitches make things more firmer. This principle is used during padstitching to add more or less firmness and structure. Machine stitching through many layers becomes stiff and hard. Stitching through the armhole to close the lining by machine, you are sewing through the jacket, sleeve, many layers of canvas and the canvas and felt in the sleeve head. Even the loose stitches used on special machines to do just this don't do a great job, and can also compress these layers which affects the shoulder expression. Sewing it all up by hand you get none of the stiffness associated with machine-felling. Two very good reasons to close by hand.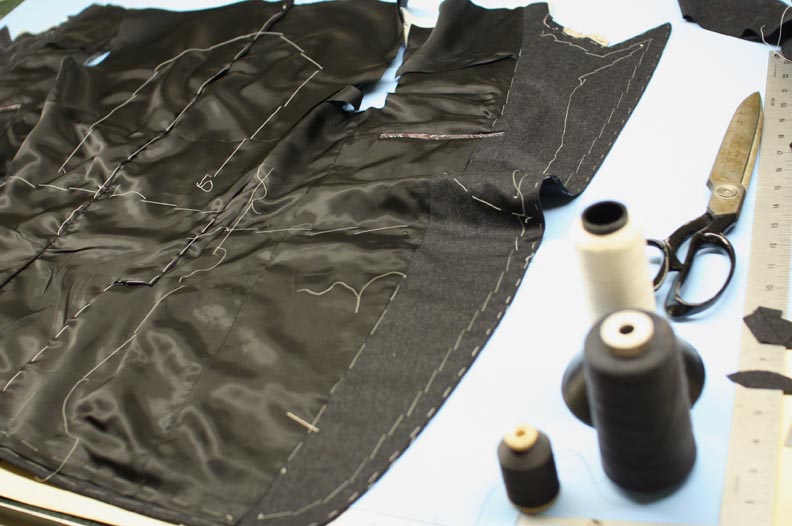
Before we even get close to the sleeve, though, better garments have been tacked together in a similar fashion to the sleeve. More affordable garments have a facing and lining which is all assembled together in one piece- it is joined to the jacket at the front edge, along the hem and the bottom of the sleeves, and the whole is turned right side out through a hole in the sleeve lining, which is then sewn shut from the right side; this is a process called bagging. It is quick but everything is hanging loose- it's like wearing two garments which don't necessarily move together. A better garment, however, will have the facing attached to the front edge, then basted in place- the inside edge of the facing is then tacked into the canvas so it won't move. Some factory-made garments will also be tacked a small amount at the side seam, but often the facing is the only one to be tacked.
There is also the issue of engineering a lining or not. There is a lot of shifting and manipulation in the process of tailoring. Better garments are usually cut bigger than required, like at the lapel, so that after the padstitching which makes things move around a bit, the lapel is later trimmed to shape. This kind of shaping and trimming goes on throughout the process so you end up with the perfect fitting garment. It is very difficult to predict how fabric will move and shrink during production and if there is no allowance for this you can end up with a garment which does not fit quite as perfectly a it should. A bagged lining assumes that the fabric will react exactly as you think it will (it never does) and so many factories struggle with alining that is too long for once fabric and too short for another, or for tight or twisted linings which pull at vents and sleeves. Not pretty. So back to the bespoke lining. The lining of a bespoke garment will be cut much bigger than the cloth so that as the fittings progress and the garment takes shape, we can trim down the lining to fit, basting it into place, and a we work across the garment, from the tacked facing edge, we can then tack the side seam all the way, the back seams, then the shoulder seams which are sewn to the shoulder pad before felling...... Every single seam has been tacked to the canvas or the cloth of the shoulder pad. Nothing is left floating freely and once we have built the shape, it is there pretty much permanently. All these tacked seams prevent us from closing up from the inside so all the lining seams are felled by hand. This is definitely one of those operations, in my opinion, in which the hand-sewn method wins, pardon the pun, hands down.
What I LOVE about this blogging thing is I get to rant about whatever I want without bugging anybody (unless, of course, they are foolish enough to read my ranting).
While I do not dislike the jacket pictured below, I am not happy about the buttonholes. The thread should be grey of some shade and I have two shades- one light and one dark. The lighter shade looked too purplish and the darker shade looked too, well, you see what it looks like.
I called Gutermann, my thread supplier, and they informed me that they no longer stock silk buttonhole twist, but that I could order it from Germany. Minimum order quantity is one box. $140. For buttonhole thread. I don't know what the german for fa'ncullo is, but my dark ugly buttonholes are as close as it gets.
end of rant
I'm getting ahead of myself, but here's one the finished jackets (I ended up making two).
 >
>
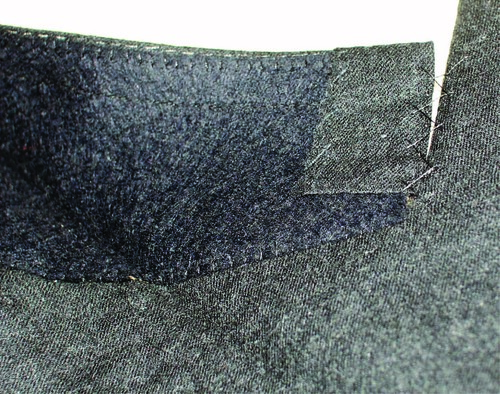
Looking at the undercollar of a jacket will reveal a lot about the quality of the jacket. A more in depth explanation will follow for the serious geeks, but the reader’s digest version is this;
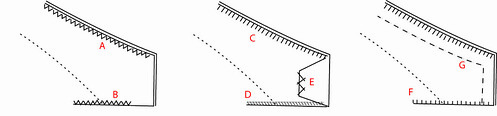
There are several ways to make a collar, some better than others. At the top end it is sometimes difficult to distinguish between hand-made, machine made, etc. but the one generalization that can be made is that if you see zig-zag stitching along the edges of the collar (figures A & B), it is not the best type of construction construction. This is an example of a more economical way of producing a collar and is either just felt or fused felt but it is certainly not felt with linen padded to it as you would find in top-of-the-line garments.
Let me clarify one thing though- it is not the stitch itself which is necessarily better or worse; the type of stitch used is an indicator of the way in which the collar is assembled and attached to the jacket, and THAT is where there are a lot of differing levels of quality.

Here is a diagram of the types of stitches I will refer to in this post.
Here is a collar which has been machine padded. Many people (myself included) feel that there is no added benefit to padding by hand over machine- but that is the subject of another post. The stitching and tape is used to stabilize the roll line; some tailors will draw this tape, keeping it close to the neck, all depending on how they construct their collar. The stitching seen at G is a very good indicator that the collar has linen canvas padded to it- the padding at the edges will be slit open so that the seam allowances of the top collar can be inserted BETWEEN the felt and the canvas, making a nice flat collar without visible impressions. Also notice that I have begun to trim away the canvas at the edge- this is necessary to prevent the canvas from showing through and is quite time-consuming. Aside from the fact that padded collar canvas costs three times what just plain felt does, it is this trimming operation which is the impetus behind factories using only felt.
In the photo below you see a collar made by Samulesohn- it is very difficult to make out the stitches at the edges of the collar but it is clear that they are not zig-zag stitches. The outer edges at C were done by machine, but one that closely resembles a hand-stitch.

The AMF machine which makes a stitch which is virtually indistinguishable from a hand stitch is pretty hard to find these days, so some factories are using a blindstitch-type machine to fell the collar. Same general procedure but different stitch like the one shown at D. Mechanically it is the same as the AMF stitch or hand-felling, but is unattractive. That said, you don’t usually go around with your collar up so who cares?
The little turn-under shown at E has been hand-finished and is the traditional way of finishing a collar, giving a smoother, flatter finish.
We hear the terms `pad stitching` and `padded lapels` frequently but not everybody understands the significance.
One of the important principles of tailoring, and which distinguishes tailoring from ordinary `flat`sewing, has to do with the fact that concentric arcs or circles become longer as they radiate from the centre. In easier terms, picture the starting line of a circular race track- the starting point of each lane is in a different spot because the outer lanes are longer than the inner lanes as they go around a bend. Tailored clothing consists of many layers of fabric that bend around each other in order to create shape. The layers of fabric and canvas in a lapel, for example, are like the lanes of a race track; the outer ones are necessarily longer than the outer ones; unlike a race track, whose lanes are staggered to maintain a consistent length, the tailor will cut the layers of fabric to different lengths so that when bent into shape they all meet together at the seam.
We have seen in a previous post that canvas contains horse hair which gives it a lofty roll. This roll contributes to the roll of the lapel but is not solely responsible for it. Once the tailor has basted the canvas and the cloth together, he will roll the lapel over his hand; the canvas being the 'outer lane' of the race track is thus a little longer than the 'inner lane' of fabric. He will sew a row of pad stitches parallel to the roll line, just catching the cloth underneath so the stitch is not visible under the lapel. At the end of the row he will roll the lapel over his hand again and sew another row of stitches, and continue until the whole lapel has been done. When it is finished, the canvas and cloth now roll as one; the canvas lends loft to the roll, but the additional length of canvas has been stitched permanently in place and so the two want to maintain the shape they were given. Notice in the photo above that the lapel stays curled- it does not fall flat to the table as it would have done had it not been pad stitched. Not only does this pad stitching create a beautiful roll in the lapel, a sign of a good-quality garment, but also helps the lapel to hug the chest tightly and not pull away, another indicator of quality.
Machines now exist which can do this job automatically, using special sensors so that the machine knows when it has reached the end of the lapel, and it will return to its starting point, advance a row, and sew the next one. The machines are quite fabulous, but also fabulously expensive; a pair (one for the right, one for the left) can cost upwards of $80,000 so are within the reach of mass-producers only. The machine takes only a few minutes to do a garment, and can do the two sides simultaneously. The garment shown above has a wide, peak lapel and took me about half an hour per lapel to do. This is a photo of a pad-stitch machine.
This is a half-canvas garment which has been pad stitched by machine
This is the same garment, showing the degree of roll.
The machine stitch is very consistent, however I may want to roll certain parts of a lapel a little more tighly, such as the very tip of a peak lapel, which can not be done by machine but can easily be done by hand. You will notice that the garment which has been stitched my machine does not roll as much as the garment at the top of the page, which was paddded by hand. This does not mean that it will not roll as well; the canvas will still provide a great deal of loft to the roll. It may not, however, hug the chest quite as tightly as a hand-padded lapel will. By varying the amount of canvas worked over the cloth and by stitching closer together or further apart I can vary the degree of roll in the lapel. This is a very fine point and I am not sure that it makes a very great difference in a finished, pressed garment. My unsubstantiated opinion is that it is better done by hand, but to really investigate further I would have to make two identical suits using identical trims and machine pad one of them, and do the other by hand. Maybe when I have retired and have nothing better to do.
The same principles apply when making the canvas front- on the CANVAS page you see a full front which has been pad stitched by hand. Again, there are several layers of material which have been worked into a particular shape and stitched together so that they will hold this shape. As I stated on that page, while I enjoy making my own fronts, I do not think there are any substantial benefits to doing them by hand over doing them by machine. I have done both ways for a long time; one is generally hoping for softness in the chest rather than stiffness and the machine does an admirable job. The amount of shaping and density of stitching can be controlled by the operator, unlike when machine-padding the lapels so I think it really is a toss-up on this issue.
It is important to note that if one were to press the lapel or chest flat you would lose almost all of the shaping which is why we generally advise against having things pressed by dry cleaners who may not be trained in pressing tailored garments (an art and a post unto itself).
So to recap, pad stitching is used to hold several layers of fabric together permanenlty in a particular shape. It gives the chest its shape, and gives the lapel its roll, helping to prevent it from pulling away from the chest- a fused lapel will never roll like a padded lapel and makes judging a garment`s quality easier. While I think it is a little better to pad a lapel by hand, I have seen no real proof of it in a finished garment; this is a matter of great contention and I do not pretend to have the answer.
Like so many parts of the garment, pockets seem like simple, insignificant little things but in reality are quite complex and pose certain challengers to cutter and tailor alike.
One of the first considerations is whether there are stripes or checks to be matched. If you look at most RTW, and even some bespoke garments, the lines of a pocket flap will match the jacket nicely below the flap, but seldom above the flap. The jets (the thin welts above and below the flap) never match on RTW but on many bespoke garments, will match nicely as in the photo below.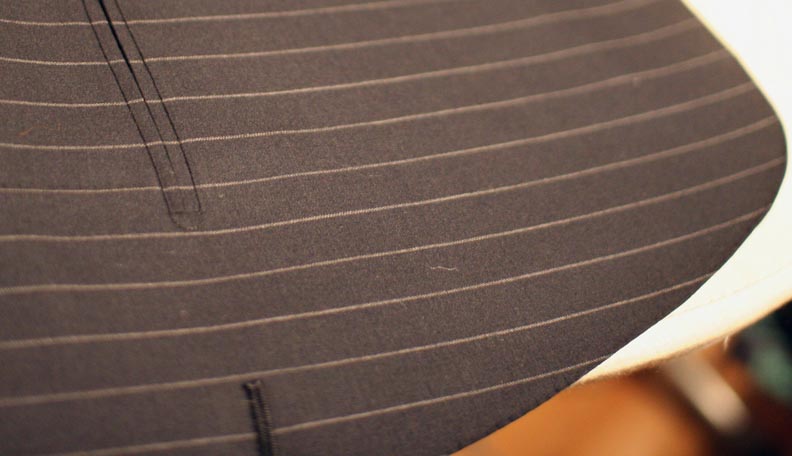
The former is due to the way the jacket front is cut- the dart is cut in such a manner as to allow a little extra length over the abdomen area, and helps keep the lower front from kicking out. It is also easier to manufacture in this way. In this photo, however, you will notice that the check matches above as well as below the flap- this is a particularly large check so I decided to cut the front differently to allow the check to continue undisturbed. I could also have cut the side body in one part with the front, thus allowing the flap to match all the way (notice that it no longer matches the side body), but I like a very trim garment and the fit is much better with a separate side body. Notice also that the jet matches the flap and the front, in fact, it is difficult to spot because a) it is matched and b) it was made by hand.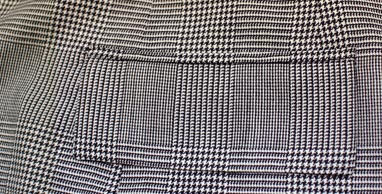
The next consideration is the ticket pocket, if one chooses to include one. Notice on my light grey jacket that I have chosen to line up the ticket pocket with the lower pocket. This cloth is plain so I was able to do this pleasingly. Looking back at the checked jacked above, you will notice that the check distorst above the pocket due to the dart. If I were to line up the ticket pocket with the lower pocket, it would match for 1/2" only. Some choose to place the pocket there anyway, others move it back behind the dart- this was the checks will match much better. We see this done both ways and I don't think there is a definitive answer to the question- which is better?
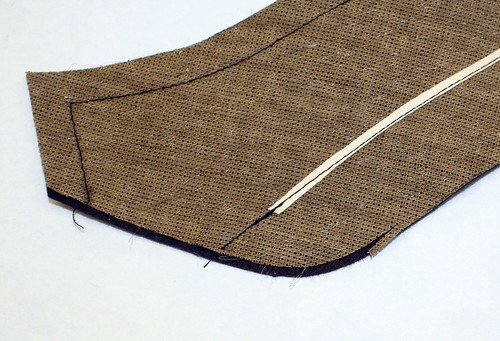
The underside, before attaching the pocket bag.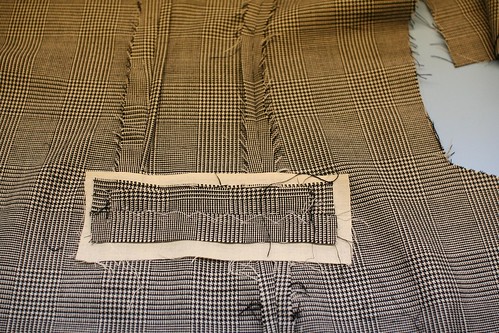
Once decisions about how the pocket will be matched to the front have been the, the jacket can be cut. In modern factories the flaps are made with jigs- special templates in the shape shape of the flap, placed on the sewing machine, a button is pressed, and the machine sews and trims the flap in one step. The flap is turned and pressed, again on a template in the form of the flap, in order to get a correct and consistent shape. Then things get complex. Machines now exist onto which the operator places a rectangle of fabric, a pellon stay, then the flap, then the pocket bag. Guided by a laser on the machine, the operator is able to place the jacket in such a way as that flap will match the front with no extra effort on their part. The machine then folds the rectangle of fabric to for the two jets, sets the flap and pocket bag, sews all together, then cuts the pocket, all in one step which takes only a few seconds. This is the result (the ticket pocket is done in another step);
The pocket is turned and the bag is tacked to the top, it is pressed, and that is it. In all, a few minutes. The jets, however, can't be matched in this way so no attempt is made; in fact, the rectangle is cut on the length of the cloth instead of the width so the stripe will run the length of the jet.
Let's now consider the hand-made method. Two rectangles of fabric are sewn by plain machine to the front in a very slight curve; they are then pressed, cut, the seams opened, basted in place, the rectangles are turned over the open seam, basted, then a prick stitch is sewn in the seam to close the jets. Done in this way, the checks or stripes can be matched- in the photo above, if it weren't for the very slight bowing of the pocket, the jet would be virtually invisible.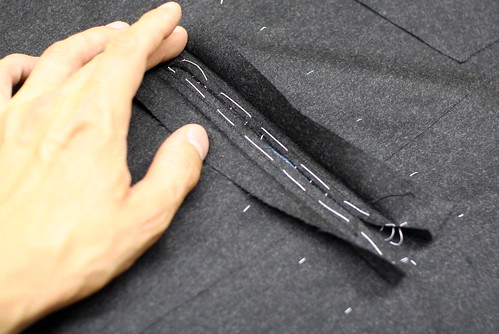
A little half-moon is often sewn by hand at the ends of the jets to tack them in place. This can also be done my automatic machine, but it is much nicer looking when done (properly) by hand;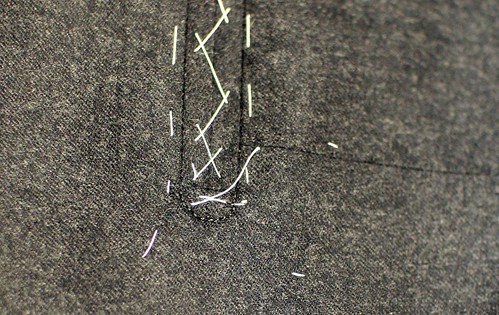
The whole process takes me about an hour for a pair of pockets, and requires a lot of care and patience. In fact, most tailors, including those on the Row, send their work out to pocket makers who specialise in this, since it is such a finnicky job. The result is a much softer, finer, flatter pocket with a much more discreet profile.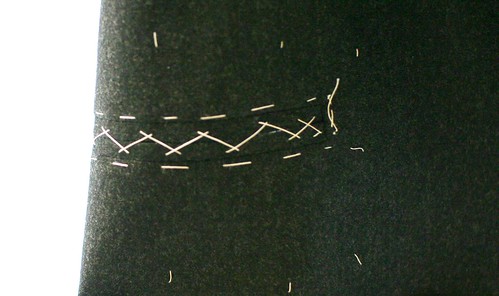
Compare this to a pocket on a RTW garment.
There is, of course, another way of making the jetted pocket without an automatic machine, but in a way which resembles it. This method is quick and easy and I use it to make the breast pockets on my lining, and may occasionally make the outer pockets this way if I am pressed for time. The pocket placement is marked with chalk, placed on the machine, I fold the jets by hand, and using the presser foot as a guide for the width, sew the jets through by machine. This method takes me about ten minutes to make a pair of pockets as opposed to the hour or so for the other method.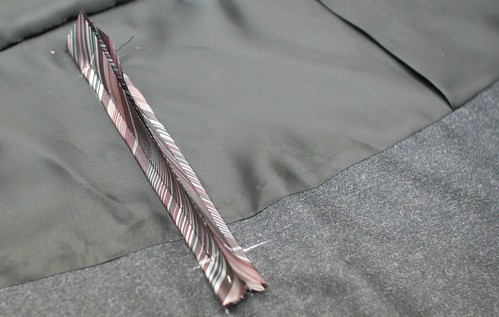
Notice how the pocket extends over the seam and onto the facing. That will allow me to tack the pocket bag invisibly onto the facing so it wont' shift, which will also later be tacked to the canvas, so all layers will move together. Some jackets have
what we call a french facing- rather than the straight seam as I have cut, the cloth will extend a little, and the pocket will be made on the cloth. There are many variations, but here is one;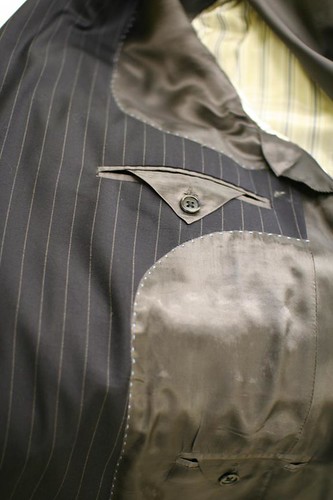
The reason I mention it is this- if you ever have to get your jacket relined, it is a much simpler operation if the pocket is made on a french facing. If the pocket extends beyound the seam like in the photo with the striped jets above, the facing will be cut in a Y shape where the pocket once was when I have removed the lining. Some tailors will just advance the seam 5/8" to cover it, but it is preferable not to. A small piece of fusible is placed behind the cut, the edges are very carefully aligned, and fused. When I have replaced the lining I will have to make a new pocket EXACTLY where the old one was, which is a job demanding great precision. Early in my career it was my job to do this sort of alteration in a factory, so from an alterations perspective, I MUCH prefer a french facing. However, I don't personally like the bulk of it which is why, for my own suits, I cut a straight facing.
So which method of pocket construction is better- by hand or machine? The hand-made pocket is certainly more attractive, softer, more discreet. The machine-made pocket is probably a lot stronger, but if you're not shoving heavy stuff in your pockets that probably doesn't matter. In this case, in my opinion, the difference is really only aesthetic.
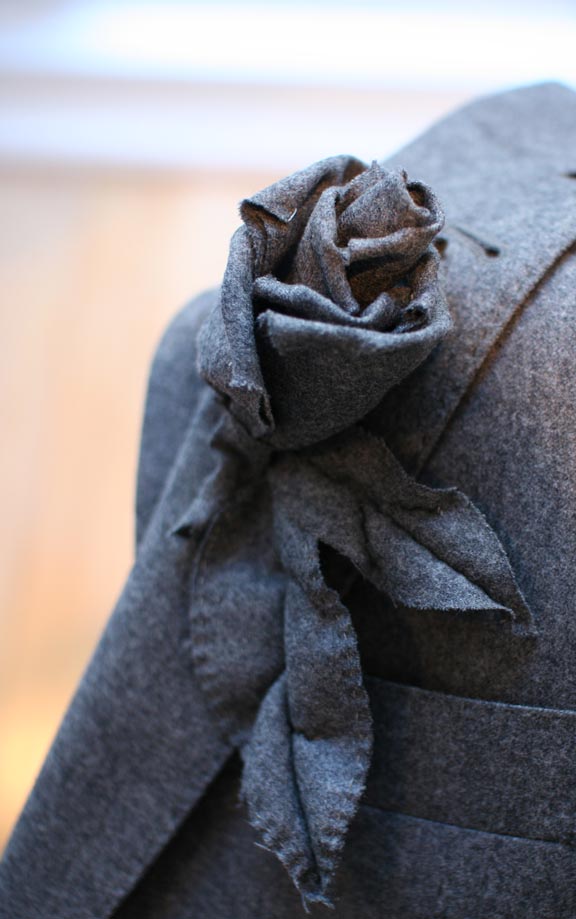
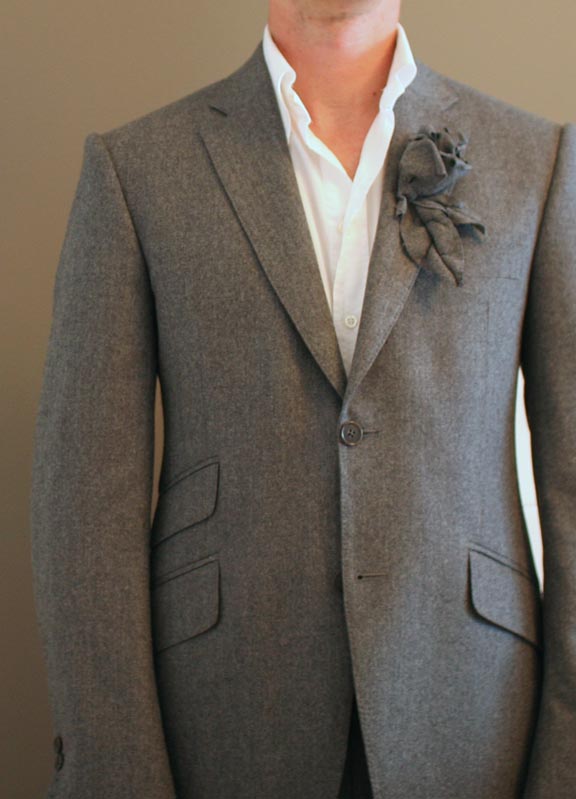
I originally intended to go work at one of the "atelier tailleur" at the haute couture in Paris; I had studied many of the techniques of the couture and have always found it fascinating, and sometimes I let it bring some whimsy to my work.
This is a recent suit, and when I got it done, I had some material left over. I like detail and accessories but not necessarily over the top, so I used a technique I leraned a long time ago and made myself a rose to wear on my lapel out of the left-over suit fabric. Fun, I think.